
Converting a backyard shed into a tiny home might sound ambitious, but it’s increasingly practical for homeowners seeking an affordable alternative dwelling space. Whether you’re looking to create a guest house, rental unit, or personal retreat, a shed conversion offers creative potential, without the massive price tag of traditional construction. This guide walks you through the key steps, from assessing your structure to installing utilities and finishing touches. We’ll cover what requires professional help, which tasks you can tackle yourself, and the real costs involved.
Table of Contents
ToggleKey Takeaways
- Shed conversion to tiny home requires upfront structural assessment of floors, roof, and foundation to avoid costly repairs during the build process.
- Check local zoning regulations and building codes early, as permit requirements vary by jurisdiction and unpermitted dwellings cannot be insured or legally occupied.
- Hire licensed professionals for electrical and plumbing work; budgeting $2,000–$4,000 for electrical and $3,000–$6,000 for plumbing ensures code compliance and safety.
- Maximize limited square footage with open layouts, lofted sleeping areas, and built-in storage solutions that eliminate wasted wall space.
- Invest in proper insulation (R-15 to R-21 for walls, R-30 to R-49 for ceilings) as a long-term cost-saver that keeps interiors comfortable and reduces heating and cooling expenses.
- A complete shed conversion typically costs $15,000–$60,000 depending on size and finishes, with the biggest savings coming from DIY demolition and framing prep work.
Assessing Your Shed And Planning The Conversion
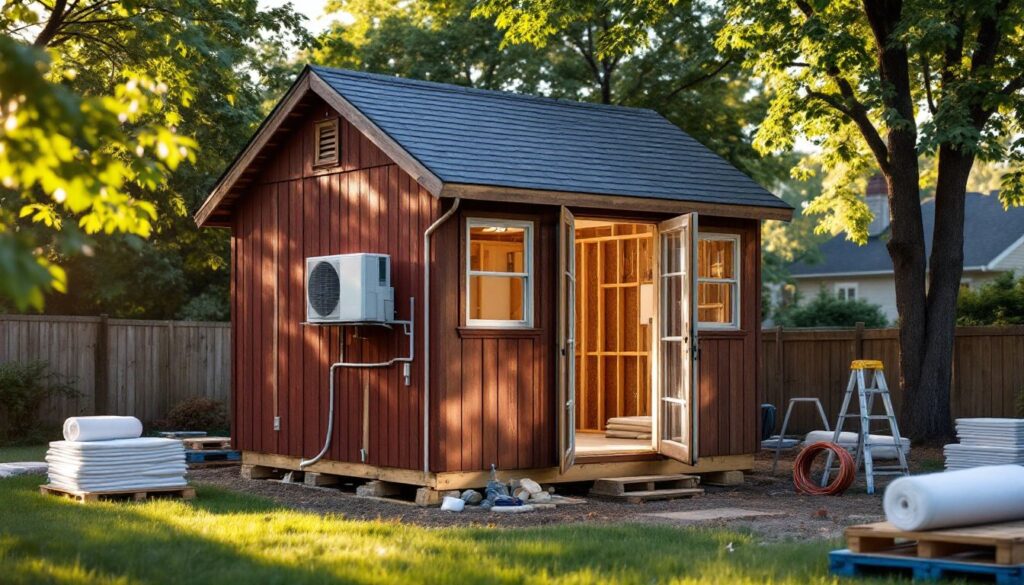
Before you start dreaming about interior layouts, get honest about your shed’s current condition. Walk around the structure with a flashlight and a notepad. Look for soft spots in the floor framing, water stains on interior walls, rot in the siding, and gaps around windows or doors. If the floor joists feel springy underfoot or you spot daylight between boards, structural repairs are likely necessary.
Measure the interior dimensions carefully, height, length, and width, then sketch a rough floor plan. Most sheds range from 8×10 feet to 12×20 feet: anything under 200 square feet is genuinely tiny, so every inch counts. Note the current location of doors and windows: moving them is expensive and may not be worth it for a small project.
Check the roof condition next. Does it have asphalt shingles, metal panels, or wood shake? If the roof leaks or is nearing the end of its life (20–30 years for standard shingles), budget for replacement before converting. A leaking structure will ruin interior work faster than almost anything else.
Finally, assess the foundation. Is it sitting on concrete blocks, a concrete pad, or just dirt and gravel? A solid foundation, whether concrete or treated posts, is non-negotiable. If your shed is on bare ground, that’s your first major project.
Understanding Local Zoning And Building Codes
This is where many DIYers stumble: before you buy a single nail, check with your local building department and zoning office. Zoning regulations vary wildly by jurisdiction. Some areas allow tiny home conversions under a certain square footage without a permit: others require one regardless of size. Some municipalities treat an occupied shed as a dwelling unit, which triggers full code compliance: others classify it as an accessory structure with lighter requirements.
Building codes, like the International Residential Code (IRC), govern electrical, plumbing, structural safety, and egress (emergency exit pathways). A tiny home typically needs at least one closable door and a window large enough to escape through in case of fire. Ceilings must be at least 7 feet tall for 75% of the floor space.
Permits aren’t optional paperwork: they protect you legally and ensure the work is safe. An unpermitted dwelling can’t be insured, can tank your home’s resale value, and may be ordered demolished by code enforcement. Call your local building department early, most offer free phone consultations. Explain your project and ask specifically what’s required: foundation certification, electrical inspection, plumbing approval, etc. Budget 4–8 weeks for permits.
If your shed is in a historic district or on a property with HOA restrictions, add another layer of research. Some jurisdictions require architectural approval before you proceed.
Essential Utilities: Electrical, Plumbing, And HVAC
Utilities are where ambition meets reality for most DIYers: electrical and plumbing work nearly always require licensed professionals, and codes are strict for good reason. You can rough-frame walls and install insulation yourself, but bringing power and water to a new structure isn’t a casual weekend project.
Electrical work: A licensed electrician must run new circuits from your main panel or a sub-panel installed outside the structure. They’ll size the wire gauge (typically 12 AWG or 10 AWG for general circuits) and ensure breaker protection. Budget $2,000–$4,000 for basic power to lights, outlets, and a small kitchen setup, depending on distance from the main house.
Plumbing: If you’re adding a bathroom or kitchenette, plumbing codes are equally tight. Supply lines must be sized correctly (typically 1/2-inch copper or PEX for main feeds), and drainage requires proper slope (1/4 inch drop per foot minimum) and venting. A licensed plumber will run these lines and handle inspections. Budget $3,000–$6,000+ for a small bathroom and kitchenette.
Heating and cooling: A tiny home’s HVAC needs are modest compared to a full house. A high-efficiency ductless mini-split system ($1,500–$3,000 installed) heats and cools efficiently without extensive ductwork. Alternatively, baseboard heaters and a through-wall AC unit work for small spaces, though less elegantly.
Don’t skip this phase or cut corners. Faulty wiring and plumbing create safety hazards and code violations that inspectors will catch.
Maximizing Space With Smart Layout And Storage Solutions
With limited square footage, every inch must earn its keep. Open floor plans feel bigger than sectioned-off rooms, but you’ll still need clear zones: sleeping area, living space, kitchen, and bathroom. Use floor-to-ceiling storage, built-in shelving, and multi-function furniture to eliminate wasted wall space.
Consider a lofted sleeping area if your ceiling height allows. A queen loft (typically 4×8 feet) leaves the ground floor open for living and kitchen use. Frame the loft with 2×8 joists spaced 16 inches on center, and ensure the structure is anchored securely to the shed’s walls. Add a safety railing (40 inches high minimum) as code requires.
Kitchen efficiency matters in a small space. A galley layout (appliances on two parallel walls) works best. A 24-inch-wide refrigerator, 24-inch cooktop, and under-counter sink can all fit in roughly 8–10 linear feet. Don’t skimp on ventilation, a downdraft range hood or window-mounted unit prevents moisture buildup.
For the bathroom, a corner or wall-mounted sink saves floor space. A compact shower stall (32×32 inches minimum per code) or a tub-shower combo beats a full-size bathtub when square footage is tight. Pocket doors or folding doors save swing space compared to hinged doors.
Built-in storage benches, under-stair drawers, and wall-mounted desks or shelving transform awkward corners into functional zones. Before buying furniture, measure doorways to ensure pieces fit through during move-in. Many DIYers build custom pieces using simple woodworking techniques that scale to their exact space.
Insulation, Flooring, And Interior Finishes
Insulation is your biggest ally in making a shed feel like home. Uninsulated sheds swing 20–30 degrees with outdoor temperature: proper insulation keeps interiors comfortable year-round while lowering heating and cooling costs.
Walls typically need R-15 to R-21 insulation, achievable with 3.5-inch fiberglass batts (R-13) or rigid foam panels topped with additional batt. The ceiling is critical, stack R-30 to R-49 insulation since heat rises. Use a vapor barrier (polyethylene sheeting) on the warm side of insulation in cold climates, or exterior vapor barriers in humid regions. This prevents condensation and mold buildup.
For flooring, assess the existing structure. If the floor joists are solid (no rot or sag), you can install flooring over them. A 3/4-inch tongue-and-groove plywood subfloor provides a stable base. Top that with luxury vinyl plank, engineered hardwood, or tile, depending on your aesthetic and budget. Avoid thick carpets in tiny spaces, they visually shrink the area. If the original floor is questionable, replace compromised joists first: this is structural work worth doing right.
Interior finishes, drywall, paint, and trim, come last. Use 1/2-inch drywall for interior walls and ceilings (less expensive than 5/8-inch unless you’re in a high-fire-risk area). Tape seams properly, apply joint compound in thin coats, and sand smooth before painting. Light colors and matte finishes visually expand small spaces better than dark or glossy paints.
Trim and flooring transitions mask gaps and look polished. Real shed-to-home conversions show how these finishing details transform a DIY project from rustic to refined.
Budget Breakdown And Cost-Saving Tips
Shed conversions cost far less than building a tiny home from scratch, but they’re not free. Budget expectations vary widely by region, material grade, and how much work you do yourself. A basic 10×12 conversion (120 square feet) typically runs $15,000–$35,000: a more finished space with quality finishes can reach $40,000–$60,000+.
Here’s a rough breakdown for a moderate 12×16 shed conversion:
- Permits and inspections: $500–$1,500
- Electrical sub-panel and wiring: $2,000–$4,000
- Plumbing (if included): $3,000–$6,000
- HVAC (ductless mini-split): $1,500–$3,000
- Insulation, drywall, and paint: $1,500–$2,500
- Flooring: $1,000–$2,500
- Windows and doors: $800–$1,500
- Fixtures (sink, toilet, shower, light fixtures, etc.): $1,500–$3,000
- Roofing repairs/replacement (if needed): $2,000–$5,000+
To save money: do demolition and framing prep yourself (clearing, removing old materials, framing new walls). Donate labor to utilities if you have handyman friends, many people love being part of a building project. Buy mid-range materials instead of budget brands: a $3,500 mini-split lasts 15 years, while a cheap window unit fails in 5. Skip the temptation to cheap out on insulation or roofing: these are long-term investments.
Reclaimed or surplus materials can cut costs. Check habitat restoration centers, architectural salvage yards, and online marketplaces for doors, windows, and fixtures at a fraction of retail. Family Handyman frequently covers DIY budget strategies that apply directly to shed conversions.
Conclusion
Converting a shed into a tiny home is achievable, rewarding, and increasingly practical as housing costs rise. The key is planning thoroughly, respecting building codes, and knowing when to call a professional. Start with an honest structural assessment, secure permits early, and invest in utilities and insulation, these fundamentals determine whether your conversion feels like a home or a glorified storage unit. With patience and realistic budgeting, your backyard shed can become a functional, comfortable living space.